- Marián Hubinský
- Technologies
- 7768 views
 Communication and control via Ethernet network brings many advantages over using USB, RS232 or GPIB. Some Delta Elektronika power supplies come with Ethernet communication as standard from factory, the rest has this as an extra PSC-ETH option (with GPIO in some cases). In this article, we describe the Ethernet communication with Delta Elektronika SM3300, however if you already own different Delta power supply with Ethernet card - do not worry, the communication is identical in most cases. We will also describe mutual communication between PC (you can also use smart device with Android OS or microcomputer such as Raspberry and so on...) and power supply. Using PLC to control the power supply is also wide-spread. Commands below are a subset of SCPI standard.
In this article we will use two communicationg devices, Computer hence as PC and Power supply hence as PSU.
At first, we need to meet some requirements:
- PSU must be connected to computer network or connected directly to the computer via Ethernet cable
- Both the PSU and PC must have their IP addresses set and the mutual communication must not be limited in any way
- PC software you plan to use must be able to connect to a TCP port 8462 (standard Power supply TCP port)
Fulfilling these requirements is necessary for trouble-free communication between the PSU and computer/smart device. In many cases, it should be a simple task to do.
The communication between computer and PSU is rather simple - computer sends simple text commands to the power supply. This means, computer is the one which controls the whole process and power supply just passively waits for commands. From TCP/IP point of view, computer software is a client and PSU is server. Some commands however expect the PSU to respond with an answer, in these cases the power supply sends a short text information back to the PC. Commands used in this communication come from SCPI language.
To send commands to the PSU, we need a suitable software which will take care of connection and communication. It is suitable to use terminal client. Up to Windows XP, we had two options - Telnet and Hyperterminal. From Windows Vista and up, none of these programs are available anymore, hence we need to use different piece of software. The most popular ones are Putty and Netcat. We are quite used to Putty, so we will use this to control the power supply, however it is up to you which one you want to use, basics are pretty similar. Putty can be downloaded from here: putty.zip.
When sending commands to PSU, it will start processing the command after it accepts line feed symbol - LF (10d, 0x0Ah). Same as received commands, answers are also ended with line feed. The line feed is normally sent after pressing [Ctrl + Enter], however in Putty you have to press [CTRL + J] and [Enter]. You can send multiple commands on a single line, simply split them with semicolon and send it using line feed. Commands which require the power supply to reply are ended with question mark.
Before we being, it is suitable to check the connection. Simply send "*IDN?" request to the power supply, if everything works well, you should get an answer with device type and serial number.
List of frequently used commands:
*IDN? - identification, device responds with type and serial number. Sample answer below:
DELTA ELEKTRONIKA BV,SM66-AR-110,000010097302,H0_P0150,0
*RST - device reset, sets all settings to factory values*PUD? - Protected User Data: device returns data stringSYST:ERR? - System Error: device returns latest error code and description. Sending this command multiple times will show previous errors, i.e.: sending the command once shows last error, sending it again will show the error before that etc..SYST:REM:CV REM - set voltage control (Constant Voltage) to remote control (REMote)SYST:REM:CC REM - set current control (Constant Current) to remote controlSOUR:VOLT:MAX? - show maximum voltage valueSOUR:CURR:MAX? - show maximum current valueSOUR:VOLT 5 - set output voltage to 5 voltsSOUR:VOLT? - show output voltageSOUR:CURR 4.125 - set output current to 4,125 A. Note: do not forget to use dot instead of comma as decimal separatorSOUR:CURR? - show output currentMEAS:VOLT? - measure and show the current voltage value on output terminals (measure output value)MEAS:CURR? - measure and show the current current value on output terminals (MEASure CURRent)OUTP 1 - turn on the output (OUTPut)OUTP? - get output statusSTAT:REG:A? - show 16 bit value of status register ASTAT:REG:B? - show 16 bit value of status register B
Units of SM15k or -CP- series are adding also control of Power and Negative CurrentSYST:REM:CP:STATUS REM - set Power control to Remote mode (Constant Power) - for units from -CP- seriesSOUR:POW 1000 - set output power to 1000 Watts (SOURce:POWer)MEAS:POW? - measure and return actual power (MEASure:POWer)SOUR:CUR:NEG 20 - set sink current (negative) to 20A (SOURce:CURrent:NEGative)SOUR:POW:NEG 1000 - set sink power (negative) to 1000W (SOURce:POWer:NEGative)
meas:volt?;meas:curr?;stat:reg:a?;stat:reg:b?;syst:err? - example of sending multiple commands on a single line, answer below:
 5.9955
 2.8291
 8193
 3
 0,None
Minimal set of commands necessary for adjusting PSU output:
SYST:REM:CV REM - set voltage control from (Constant Voltage) to remote control (REMote)SYST:REM:CC REM - set current control from (Constant Current) to remote controlSOUR:VOLT 5 - set output voltage to 5 voltsSOUR:CURR 4.125 - set output current to 4,125 A. Note: do not forget to use dot instead of comma as decimal separatorOUTP 1 - turn on the output (OUTPut)
Measure actual Voltage and Current at PSU output:
MEAS:VOLT? - measure and show the current voltage value on output terminals (measure output value)MEAS:CURR? - measure and show the current current value on output terminals (MEASure CURRent)
Apart from these basic commands, you can find much more in the user manual. The PSU does not differ between lower-case and capital letters. All commands have short and long form, you can mix it as you like.
For example, sending a command to set voltage to 5 volts can have any of these forms:
SOURce:VOLtage 5sour:vol 5source:volt 5source:voltage 5sour:voltage 5SoUrCe:VoLt 5
Using the Watchdog timer is described in this article: Watchdog timer and power supply.
To set an IP address and send commands directly from Windows's command prompt, you can use our Command line PSU Configurator and Commander software.
If you need to test communication or custom commands, our PSU Control program is also a good helper. On its Communication screen, available in the Settings menu, there is an option to send commands, including a list of the most frequently used commands.

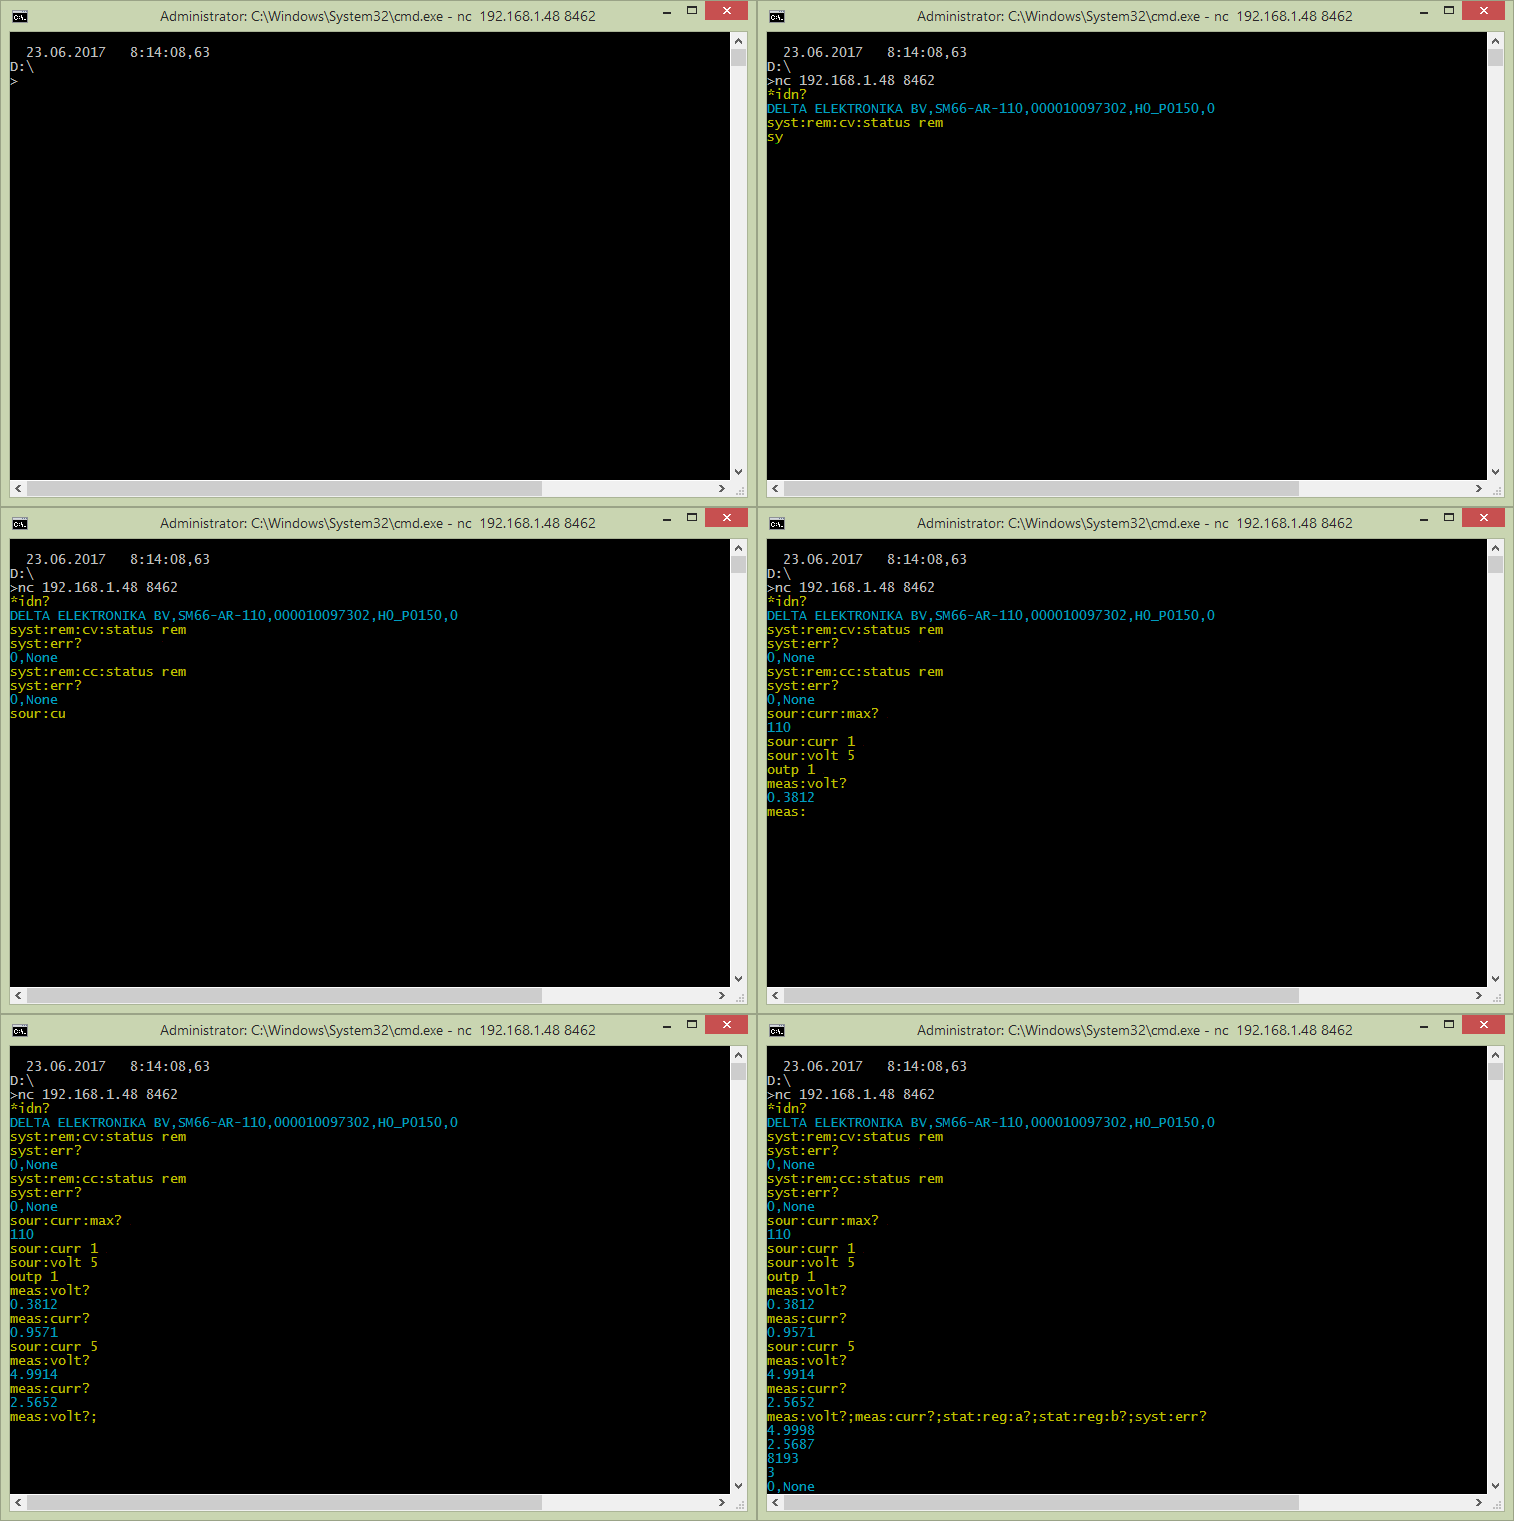
Demonstration of sending a command to Delta Elektronika SM66-AR-110 - SM3300 series using netcat software.
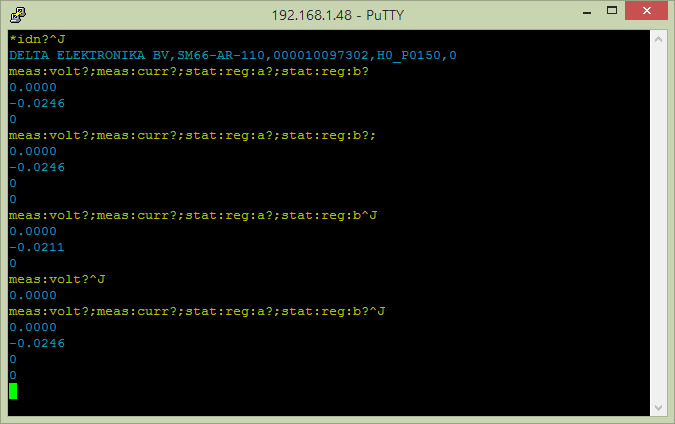
Communication via putty looks like this:
Notice the ^J symbol [CTRL+J] for sending a line feed (ending the command).
Setting putty.


